Skip to content
0
  • Recent
  • Tags
  • Popular
  • Search
  • ads.txt
  • Recent
  • Tags
  • Popular
  • Search
  • ads.txt
Collapse
Lime-it.us
lime-itL

lime-it

@lime-it
administrators
About
Posts
8
Topics
6
Shares
0
Groups
1
Followers
0
Following
0

Posts

Recent Best Controversial

  • Install BackupPC4 Ubuntu Debian {script}
    lime-itL lime-it

    Use the same script for updating/ upgrading

    Make sure to change the versions to the latest releases:

    #!/bin/bash
    set -e
    bpcver=4.2.1
    bpcxsver=0.57
    rsyncbpcver=3.0.9.12
    

    Scroll through the script, know what you are doing.

    Uncomment the upgrade section(s) and comment out the install section(s)

    Backup Solutions debian backuppc4 install script ubuntu

  • ddrescue clone failing hard drive
    lime-itL lime-it

    Again running smartctl after all is said and done:

    smartctl --all /dev/sda

    ddrescue-smartctl-after-rescue.png ddrescue-smartctl-2.png

    Yet an old drive in itself, I run the wheels off of them, and monitor regularly as anyone should.

    Linux Systems Guides smartmontools lsblk data ddrescue fdisk debian recovery proxmox

  • ddrescue clone failing hard drive
    lime-itL lime-it

    Clone hard drive with ddrescue

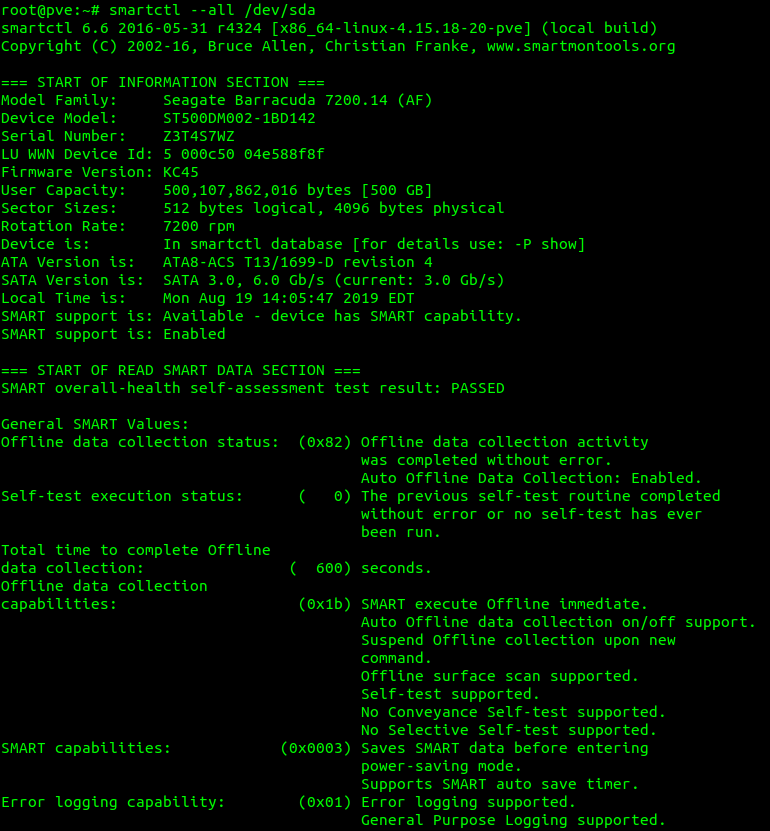
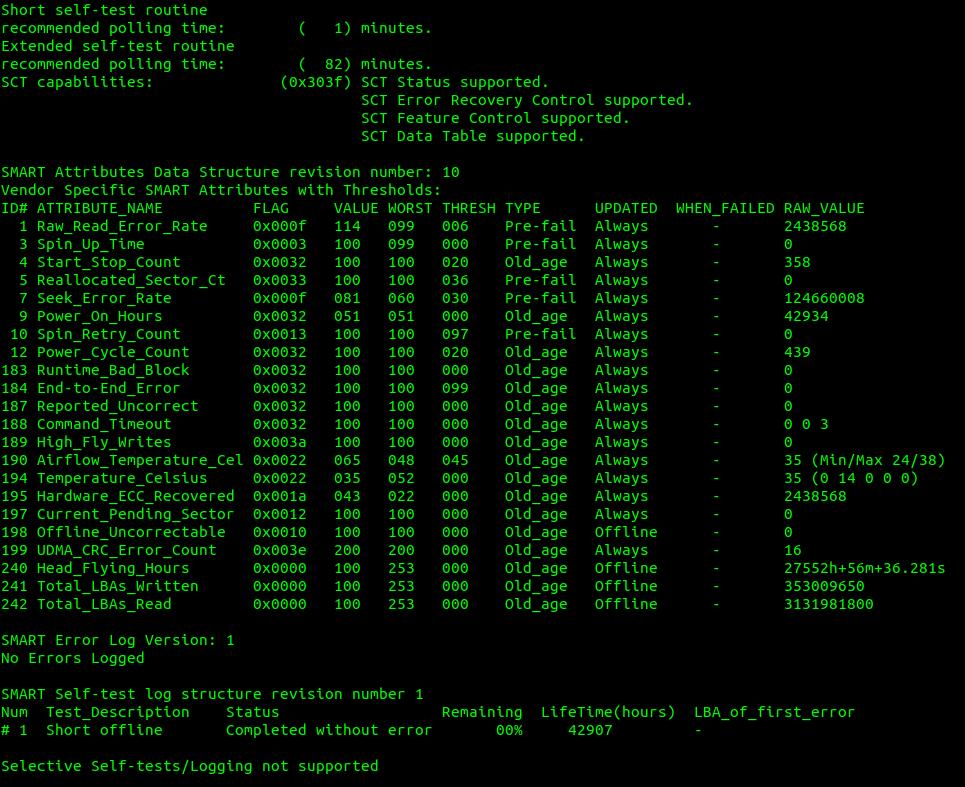
    Testing a hard drive for failure via smartmontools

    Install smartmontools if not already present: (debian)

    apt-get install smartmontools

    Locate specific hard drives currently installed:

    lsblk


    In this case I choose device ‘sda’

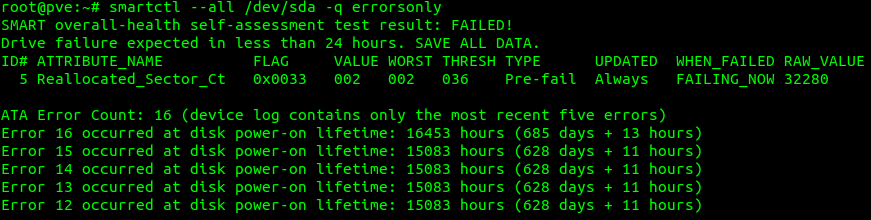
    smartctl --all /dev/sda -q errorsonly

    Example of failing hard drive: smart-failure.png


    Preparing a used hard drive for cloning

    Clearing existing partitions from destination hard drive:

    In this case the destination drive is defined as sdc:

    I’ll use fdisk to clear all existing partitions:
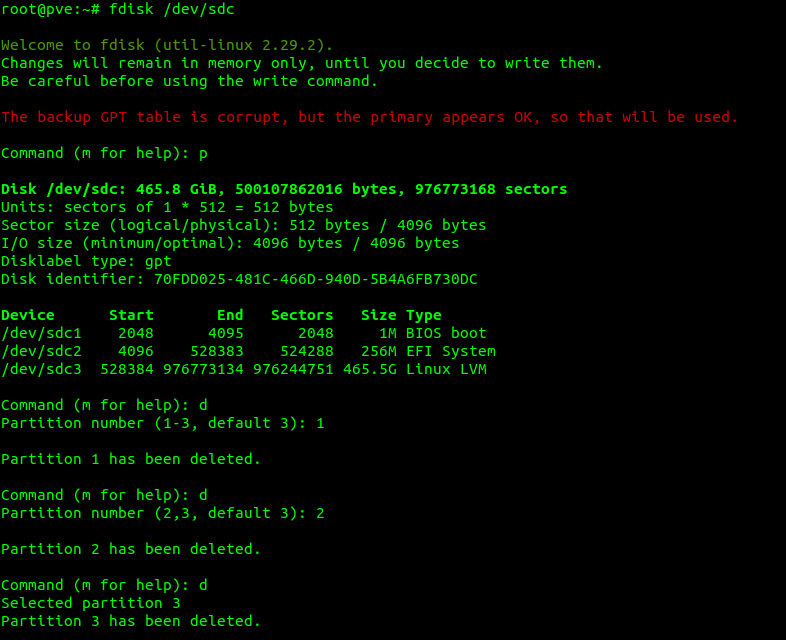
    fdisk /dev/sdc Then print partition existing on sdc by typing the letter p

    p

    fdisk.png

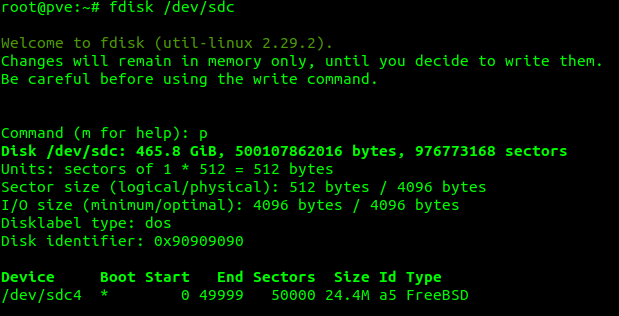
    The above image shows some detail on the destination drive, including on FreeBSD partition named /dev/sdc4

    Since there is only one partition on the destination drive, we simply need to type the letter d at the fdisk command prompt:

    d

    fdisk-delete.png

    If there are more existing partitions on the destination drive, we are presented with them, and numbers to go along, we select which partition via numbers what we delete (in this case everything)

    fdisk-multiple-partitions.png

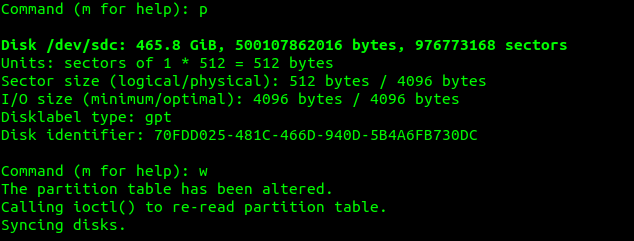
    Once we’ve removed the partitions, we type the letter w to write the changes, (actually delete the partitions)

    I type the letter p once again to make sure no partitions are still on the disk and then the letter w to write the changes:

    fdisk-write.png


    Using ddrescue to clone the hard drive:

    !Insure your drive letters are correct!

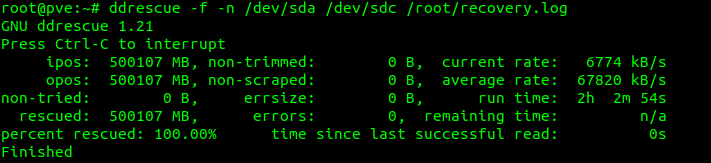
    The command I use to simplify the procedure including reading the damaged drive and putting as little pressure on it as we can manage, while getting as much data as we can, are as follows:

    Insure existing, or damaged hard drive first, and destination hard drive second (In other terms input file first and output file second)

    ddrescue -f -n /dev/sda /dev/sdc /root/recovery.log

    From https://linux.die.net/man/1/ddrescue

    -f, --force overwrite output device or partition

    -n, --no-split do not try to split or retry failed blocks

    We set a log file, which ddrescue can read later if for any reason the proceedure fails in the middle. Or also if we do not get as close to a 100% success rate when finished, the log file will set ddrescue to only attempt to get failed blocks on additional runs.

    ddrescue.png

    In this case 100% of the data was recovered, and transferred to the new hard drive:

    ddrescue-complete.png

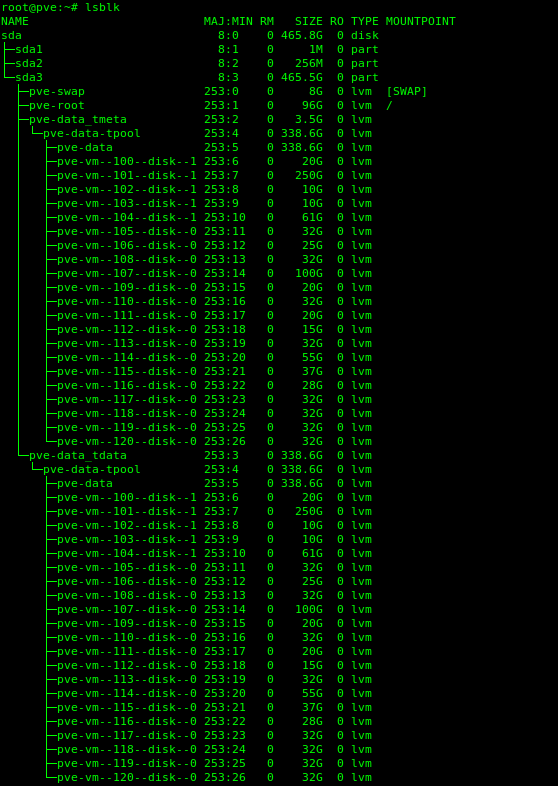
    I run lsblk once again to check partitions have been transferred: ddrescue-new-partitions.png


    I then restart the machine:

    shutdown -r now

    After a restart, the journal will be recovered as well as other routine scripts run. I remove other old, damaged hard drives during the restart just before the BIOS kicks up.

    Again after a restart I run :

    lsblk

    ddrescue-new-harddrive.png

    Fin!


    Note This local server is a test environment running ProxMox. Everything running as it should after the clone.

    Linux Systems Guides smartmontools lsblk data ddrescue fdisk debian recovery proxmox

  • ISO from DVD to local file
    lime-itL lime-it

    Make ISO from DVD

    In this case I had an OS install disk which was required to be on a virtual node with no optical drive, so I needed to transfer an image to the server to create a VM

    Find out which device the DVD is:

    lsblk
    

    Output:

    NAME            MAJ:MIN RM   SIZE RO TYPE MOUNTPOINT
    sda               8:0    0 465.8G  0 disk 
    ├─sda1            8:1    0     1G  0 part /boot
    └─sda2            8:2    0 464.8G  0 part 
      ├─centos-root 253:0    0    50G  0 lvm  /
      ├─centos-swap 253:1    0  11.8G  0 lvm  [SWAP]
      └─centos-home 253:2    0   403G  0 lvm  /home
    sdb               8:16   1  14.5G  0 disk /mnt
    sr0              11:0    1   4.1G  0 rom  /run/media/rick/CCSA_X64FRE_EN-US_DV5
    

    Therefore /dev/sr0 is the location , or disk to be made into an ISO

    I prefer simplicity, and sometimes deal with the fallout after the fact, however Ive repeated this countless times with success.

    dd if=/dev/sr0 of=win10.iso
    

    Where if=Input file and of=output file

    I chill out and do something else while the image is being copied/created, and the final output:

    8555456+0 records in
    8555456+0 records out
    4380393472 bytes (4.4 GB) copied, 331.937 s, 13.2 MB/s
    

    Fin!

    Linux Systems Guides copy windows command line iso vm dd

  • OpenNMS Postgresql ASCII error fix
    lime-itL lime-it

    Recreate postrgresql database template encode to ASCII

    UPDATE pg_database SET datistemplate = FALSE WHERE datname = 'template1';
    

    Now we can drop it:

    DROP DATABASE template1;
    

    Create database from template0, with a new default encoding:

    CREATE DATABASE template1 WITH TEMPLATE = template0 ENCODING = 'UNICODE';
    
    UPDATE pg_database SET datistemplate = TRUE WHERE datname = 'template1';
    
    \c template1
    
    VACUUM FREEZE;
    

    Linux Systems Guides ascii opennms postgresql

  • Install BackupPC4 Ubuntu Debian {script}
    lime-itL lime-it

    Install BackupPC4 Debian Ubuntu

    The following page outlines how to install BackupPC 4 from the latest official release tarballs or from git. For instructions on building packages, see Build Your Own Packages.

    These instructions are tested on Ubuntu Xenial 16.04 LTS and Ubuntu Bionic 18.04 LTS. The script will likely work on other versions and on most other Debian-derived distributions as well.

    Installing BackupPC 4 from the latest git sources is a rather long process at the moment. To make it easy, you can use the following script to install a dedicated BackupPC 4 server. The script is tested on a clean installation, so beware of any conflicting web sites if you are not installing on a dedicated server.

    The script will use a single password for both your web interface backuppc user and the local backuppc user. It also allows any client to connect, so make sure to tune security settings for a production environment. Run it with root privileges (i.e. sudo bash installbackuppc or chmod 755 installbackuppc && sudo ./installbackuppc if you saved the script as installbackuppc).

    IMPORTANT SCRIPT UPDATE: Latest script updated

    #!/bin/bash
    set -e
    bpcver=4.2.1
    bpcxsver=0.57
    rsyncbpcver=3.0.9.12
    
    # Needed only when installing
    apt-get install -q -y apache2 apache2-utils libapache2-mod-perl2 glusterfs-client par2 perl smbclient rsync tar sendmail gcc zlib1g zlib1g-dev libapache2-mod-scgi rrdtool git make perl-doc libarchive-zip-perl libfile-listing-perl libxml-rss-perl libcgi-session-perl
    echo -n "Give password or leave empty to generate one: "
    read -s PASSWORD
    echo
    if [[ $PASSWORD == "" ]]; then
      apt-get -qq -y install pwgen
      PASSWORD=`pwgen -s -1 32`
      echo "Generated password: $PASSWORD"
    else
      echo "Password given is: $PASSWORD"
    fi
    echo "$PASSWORD" > /root/password
    chmod 600 /root/password
    mkdir /srv/backuppc
    ln -s /srv/backuppc/ /var/lib/backuppc
    adduser --system --home /var/lib/backuppc --group --disabled-password --shell /bin/false backuppc
    echo "backuppc:$PASSWORD" | sudo chpasswd backuppc
    mkdir -p /var/lib/backuppc/.ssh
    chmod 700 /var/lib/backuppc/.ssh
    echo -e "BatchMode yes\nStrictHostKeyChecking no" > /var/lib/backuppc/.ssh/config
    ssh-keygen -q -t rsa -b 4096 -N '' -C "BackupPC key" -f /var/lib/backuppc/.ssh/id_rsa
    chmod 600 /var/lib/backuppc/.ssh/id_rsa
    chmod 644 /var/lib/backuppc/.ssh/id_rsa.pub
    chown -R backuppc:backuppc /var/lib/backuppc/.ssh
    
    # Fetch and install latest stable releases
    wget https://github.com/backuppc/backuppc-xs/releases/download/$bpcxsver/BackupPC-XS-$bpcxsver.tar.gz
    wget https://github.com/backuppc/rsync-bpc/releases/download/$rsyncbpcver/rsync-bpc-$rsyncbpcver.tar.gz
    wget https://github.com/backuppc/backuppc/releases/download/$bpcver/BackupPC-$bpcver.tar.gz
    tar -zxf BackupPC-XS-$bpcxsver.tar.gz
    tar -zxf rsync-bpc-$rsyncbpcver.tar.gz
    tar -zxf BackupPC-$bpcver.tar.gz
    cd BackupPC-XS-$bpcxsver
    perl Makefile.PL
    make
    make test
    make install
    cd ../rsync-bpc-$rsyncbpcver
    ./configure
    make
    make install
    cd ../BackupPC-$bpcver
    
    # To fetch and install the latest development code instead, replace the above section with:
    #git clone https://github.com/backuppc/backuppc.git
    #git clone https://github.com/backuppc/backuppc-xs.git
    #git clone https://github.com/backuppc/rsync-bpc.git
    #cd backuppc-xs
    #perl Makefile.PL
    #make
    #make test
    #make install
    #cd ../rsync-bpc
    #./configure
    #make
    #make install
    #cd ../backuppc
    #./makeDist --nosyntaxCheck --releasedate "`date -u "+%d %b %Y"`" --version ${bpcver}git
    #tar -zxf dist/BackupPC-${bpcver}git.tar.gz
    #cd BackupPC-${bpcver}git
    
    # When installing, use this
    ./configure.pl --batch --cgi-dir /var/www/cgi-bin/BackupPC --data-dir /var/lib/backuppc --hostname backuppc --html-dir /var/www/html/BackupPC --html-dir-url /BackupPC --install-dir /usr/local/BackupPC
    
    # When upgrading, use this instead:
    # ./configure.pl --batch --config-path /etc/BackupPC/config.pl
    
    # The following is good also when upgrading, unless you have modified the files yourself
    cp httpd/BackupPC.conf /etc/apache2/conf-available/backuppc.conf
    sed -i "/deny\ from\ all/d" /etc/apache2/conf-available/backuppc.conf
    sed -i "/deny\,allow/d" /etc/apache2/conf-available/backuppc.conf
    sed -i "/allow\ from/d" /etc/apache2/conf-available/backuppc.conf
    
    # Note that changing the apache user and group (next two commands) could cause other services
    # provided by apache to fail. There are alternatives if you don't want to change the apache
    # user: use SCGI or a setuid BackupPC_Admin script - see the docs.
    sed -i "s/export APACHE_RUN_USER=www-data/export APACHE_RUN_USER=backuppc/" /etc/apache2/envvars
    sed -i "s/export APACHE_RUN_GROUP=www-data/export APACHE_RUN_GROUP=backuppc/" /etc/apache2/envvars
    echo '<html><head><meta http-equiv="refresh" content="0; url=/BackupPC_Admin"></head></html>' > /var/www/html/index.html
    a2enconf backuppc
    a2enmod cgid
    service apache2 restart
    cp systemd/init.d/debian-backuppc /etc/init.d/backuppc
    chmod 755 /etc/init.d/backuppc
    update-rc.d backuppc defaults
    chmod u-s /var/www/cgi-bin/BackupPC/BackupPC_Admin
    touch /etc/BackupPC/BackupPC.users
    sed -i "s/$Conf{CgiAdminUserGroup}.*/$Conf{CgiAdminUserGroup} = 'backuppc';/" /etc/BackupPC/config.pl
    sed -i "s/$Conf{CgiAdminUsers}.*/$Conf{CgiAdminUsers} = 'backuppc';/" /etc/BackupPC/config.pl
    chown -R backuppc:backuppc /etc/BackupPC
    
    # Needed only when installing
    echo $PASSWORD | htpasswd -i /etc/BackupPC/BackupPC.users backuppc
    
    
    service backuppc start
    

    https://github.com/backuppc/backuppc/wiki/Installing-BackupPC-4-from-tarball-or-git-on-Ubuntu

    Backup Solutions debian backuppc4 install script ubuntu

  • Add tun device to LXC Proxmox
    lime-itL lime-it

    Add tun device to LXC

    Shutdown container:

    Where 100 is the container ID

    pct shutdown 100
    

    Move into your container config file:

    vi /etc/pve/lxc/100.conf
    

    Add the following to the end of the file:

    Type lthe letter i to edit in vi

    i
    

    Add the following into the file:

    lxc.hook.autodev: /var/lib/lxc/100/tuntap
    lxc.cgroup.devices.allow = c 10:200 rwm
    

    Save changes and exit:

    Tap esc key to leave edit insert mode:

    Then, Write and Quit saving the changes

    :wq
    

    Create the tun device:

    vi /var/lib/lxc/100/tuntap
    

    Enter the following into the new file:

    #!/bin/bash
    cd ${LXC_ROOTFS_MOUNT}/dev
    mkdir net
    mknod net/tun c 10 200
    chmod 0666 net/tun
    

    Save and quit


    You are good to restart the container.

    Type :

    ip a
    

    To view the devices, remembering the tun device will not be available until you start a script such as openvpn. Or manually start the device for whatever reason.

    Linux Systems Guides openvpn tun lxc proxmox

  • Su backuppc backuppc4
    lime-itL lime-it

    Having trouble getting to the backuppc user to ssh-copy-id ?

    su -s /bin/bash - backuppc

    or

    sudo su -s /bin/bash - backuppc

    Backup Solutions backuppc4 ssh-copy-id command line su
  • Login

  • Don't have an account? Register

  • Login or register to search.
  • First post
    Last post