rick
@rick
Posts
-
I won the settlement! scam -
Backup Redis
Create a shell script that will dump the Redis database
cd ~
mkdir redi-backups-script
cd redis-backups-script
nano redis_backups-script.sh
Paste the script below:
#!/bin/bash
rdb_file="/Place-directory-of-rdb-here/redis/dump.rdb"
redis_cli="/usr/bin/redis-cli"

DIR=`date +%d-%m-%y`
DEST=~/redis_backups/$DIR
mkdir $DEST

echo save| $redis_cli
exit 1
Set script to executable:
chmod +x ~/scripts/redis_backups-script.shCreate a cron to run daily:
Then create a cron job to run the script every day at midnight:
crontab -e0 0 * * * ~/redis-backups-script/redis_backup.shRestore RDB backup
Disable Append Only in the config:
nano /etc/redis/redis.confappendonly noStop redis:
sudo service redis-server stopRestore the redis backup:
rename the rdb file you wish sudo cp /home/redis/dump.rdb /home/redis/dump.rdb.bak
You can then copy the backup rdb file as follows:
sudo cp /redis_backups/------/dump.rdb /home/redis/dump.rdbApply the proper permissions to the dump.rdb file:
sudo chmod 660 /home/redis/dump.rdbRe-starting Redis server
sudo service redis-server start -
Installing Zabbix 7.2 agent2 DebianInstall Zabbix 7.2 repo
wget https://repo.zabbix.com/zabbix/7.2/release/debian/pool/main/z/zabbix-release/zabbix-release_latest_7.2+debian12_all.deb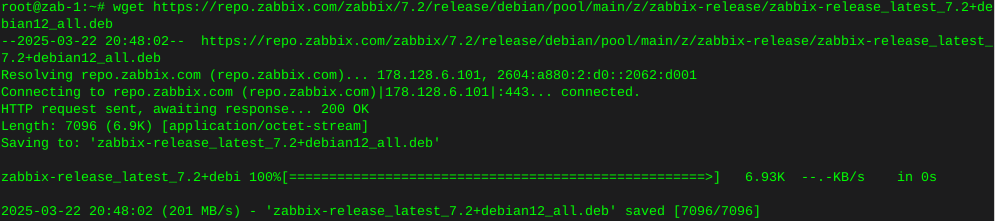
dpkg -i zabbix-release_latest_7.2+debian12_all.deb
Update repos
apt update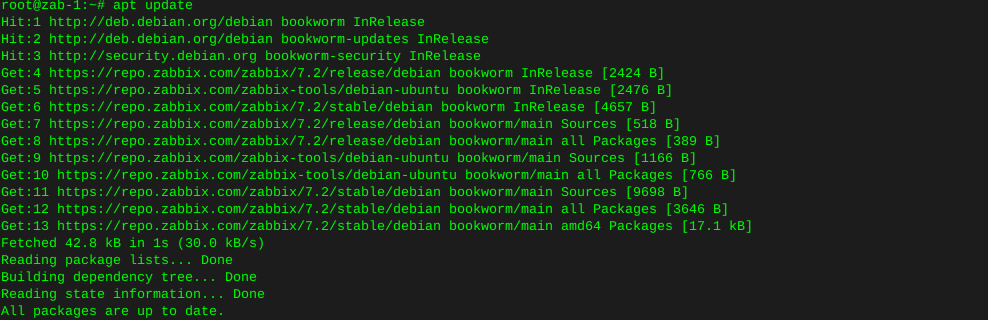
Install Zabbix server and frontend
apt install zabbix-server-mysql zabbix-frontend-php zabbix-nginx-conf zabbix-sql-scripts zabbix-agent2
Install plugins
apt install zabbix-agent2-plugin-mongodb zabbix-agent2-plugin-mssql zabbix-agent2-plugin-postgresql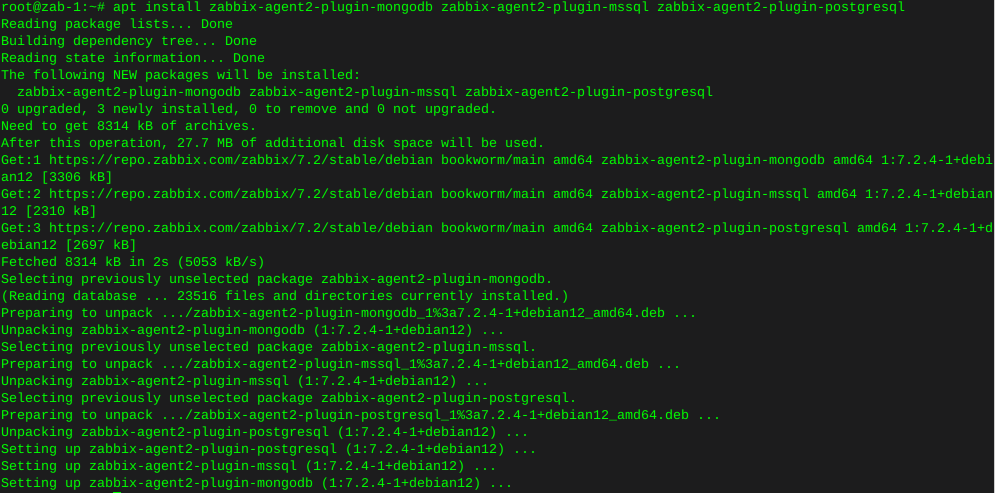
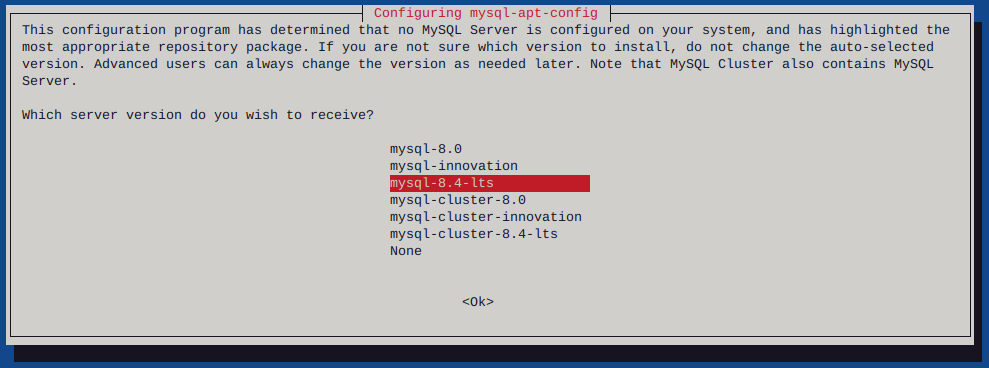
Install mysql
wget https://dev.mysql.com/get/mysql-apt-config_0.8.30-1_all.deb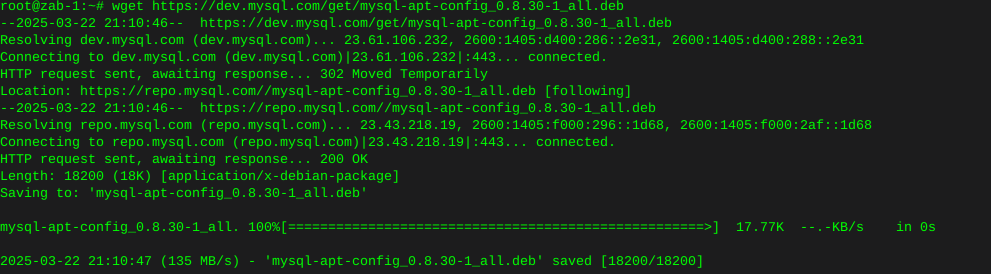
sudo dpkg -i mysql-apt-config_0.8.30-1_all.debError on this new install, where lsb-release is not installed

apt-get install lsb-release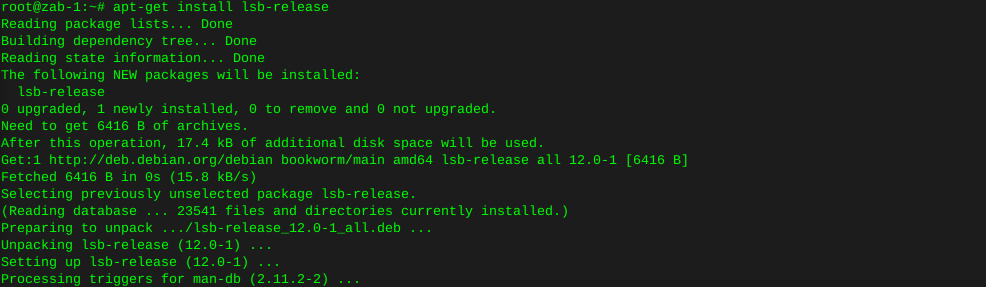
Try again…
dpkg -i mysql-apt-config_0.8.30-1_all.debError, gnupg not installed

apt install gnupg2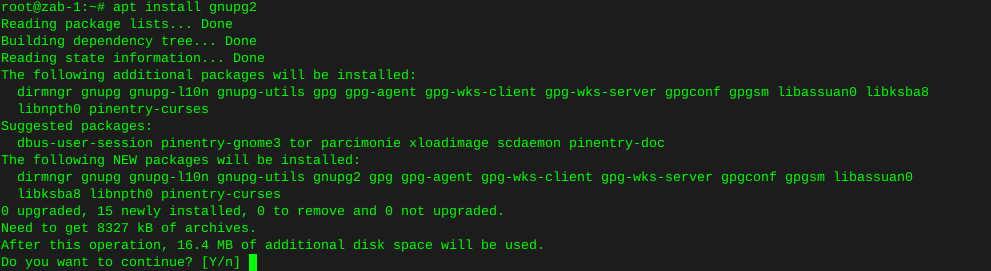
Give it another go…
dpkg -i mysql-apt-config_0.8.30-1_all.deb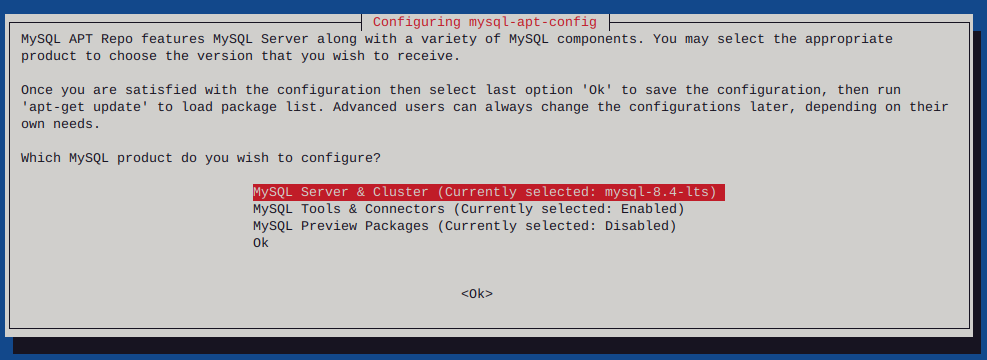
I had to list upgradable packages :
apt-list --upgradableWhich spit out : mysql-common/unknown 8.4.4-1debian12 all [upgradable from: 5.8+1.1.0]
Then installed mysql-common
apt-get install mysql-common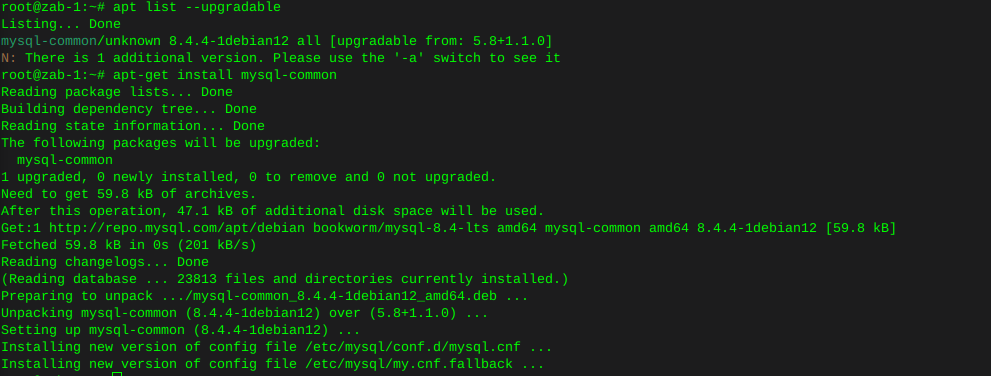
Had to uninstall Mariadb to resolve these conflicts
apt remove mariadb-client-coreThen install mysql-server:
apt install mysql-server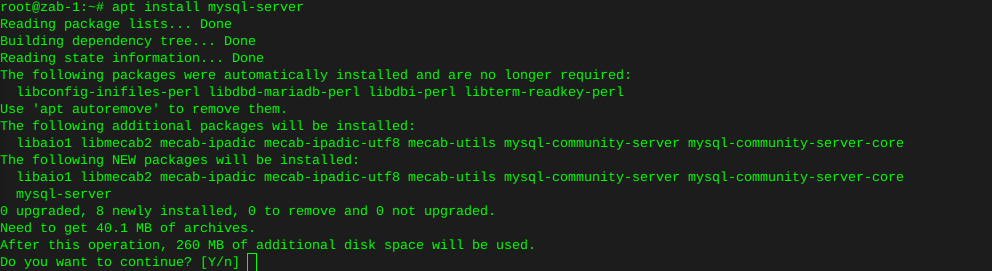
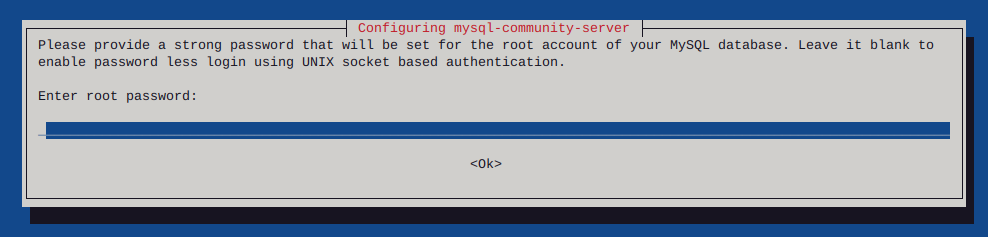
Enter your password, twice
Now enter mysql by typing :
mysql -u root -p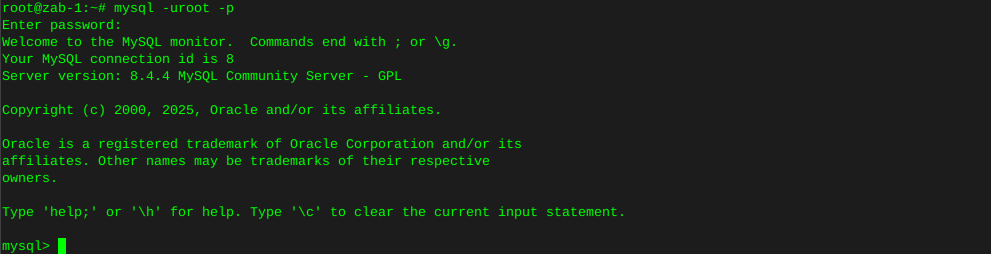
Enter the following command individually Where ‘password’ is where you type in your actual own password
mysql> create database zabbix character set utf8mb4 collate utf8mb4_bin;
mysql> create user zabbix@localhost identified by 'password';
mysql> grant all privileges on zabbix.* to zabbix@localhost;
mysql> set global log_bin_trust_function_creators = 1;
mysql> quit;
Populate the database with zabbix script
zcat /usr/share/zabbix/sql-scripts/mysql/server.sql.gz | mysql --default-character-set=utf8mb4 -uzabbix -p zabbixmysql --u root -pset global log_bin_trust_function_creators = 0; quit;Edit file /etc/zabbix/zabbix_server.conf You can use nano
nano /etc/zabbix/zabbix_server.confUncomment the DBPassword section, and type your password
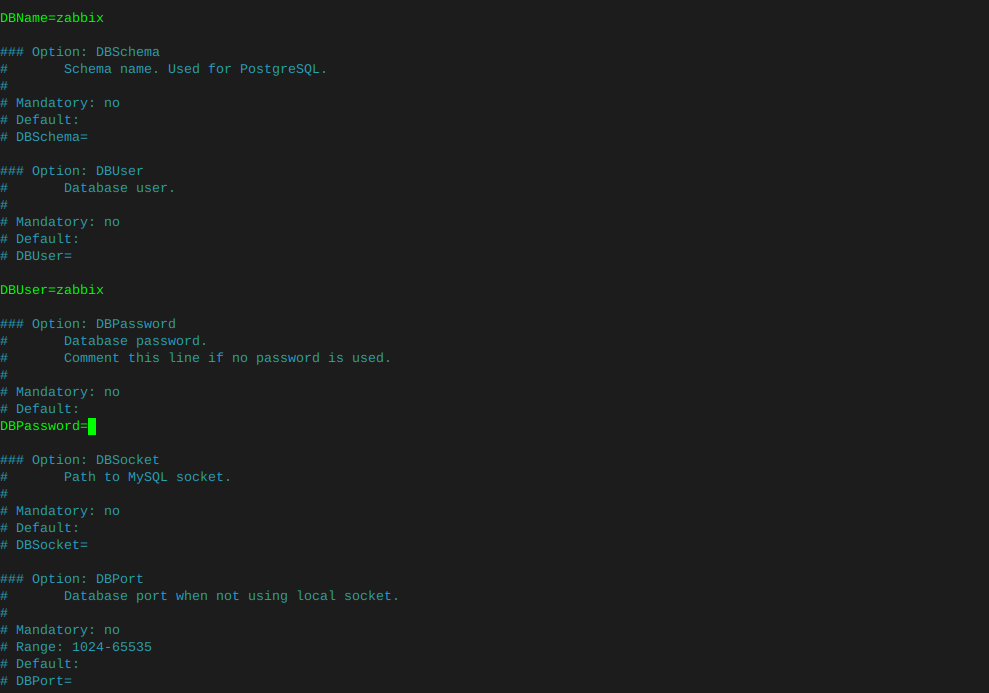
Then hold ctrl and tap x, it will ask if you want to save changes.
Enable services:
systemctl enable zabbix-server zabbix-agent2 nginx php8.2-fpm
systemctl restart zabbix-server zabbix-agent2 nginx php8.2-fpm
Check that zabbix service has started
journalctl -xeu zabbix-server.service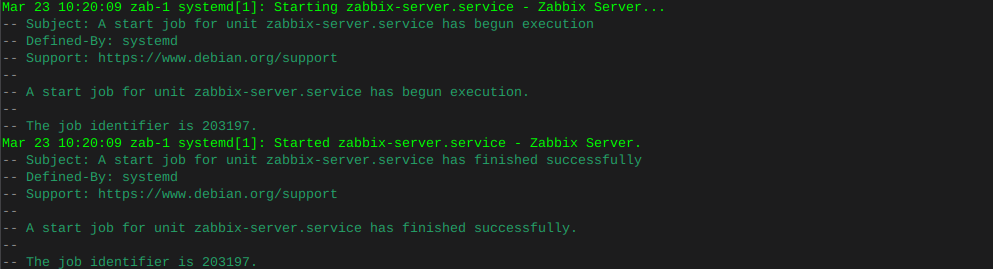
Delete the 'default site in nginx
sudo rm -rf /etc/nginx/sites-enabled/defaultMake sure the symbolic link to the zabbix nginx file is present
ln -s /etc/zabbix/nginx.conf /etc/nginx/sites-enabled/zabbix.confCheck that the zabbix nginx file is in the includes in nginx config
nano /etc/nginx/nginx.confLook for :
include /etc/nginx/sites-enabled/*Now restart nginx
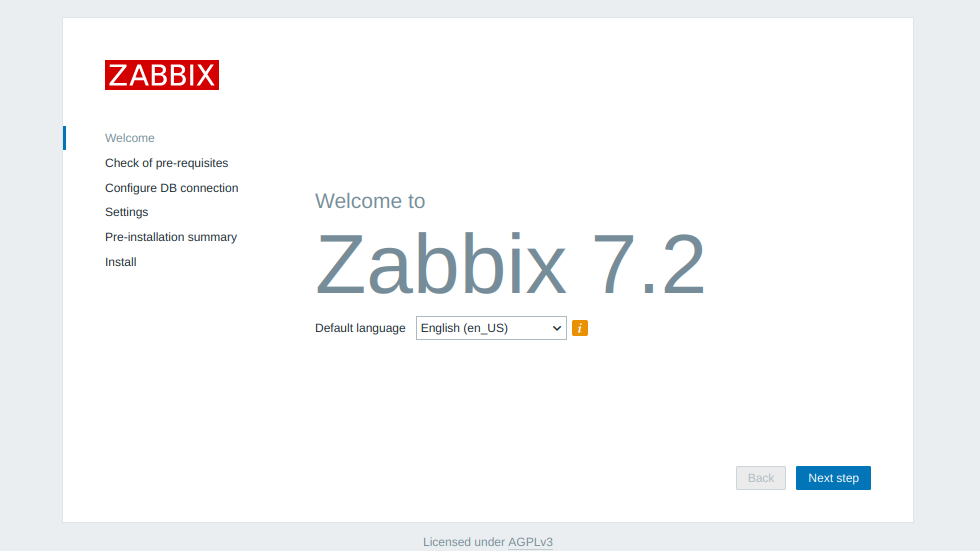
systemctl restart nginxHit the browser and type in the IP (or URL that you may have put in the zabbix nginx config file)
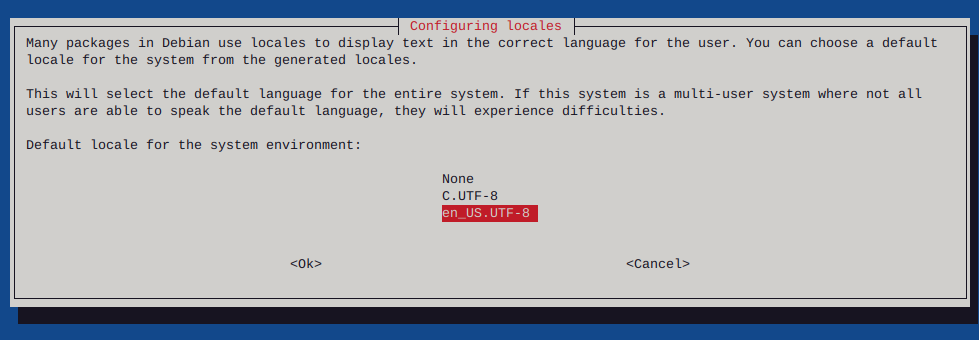
Make sure to configure locales
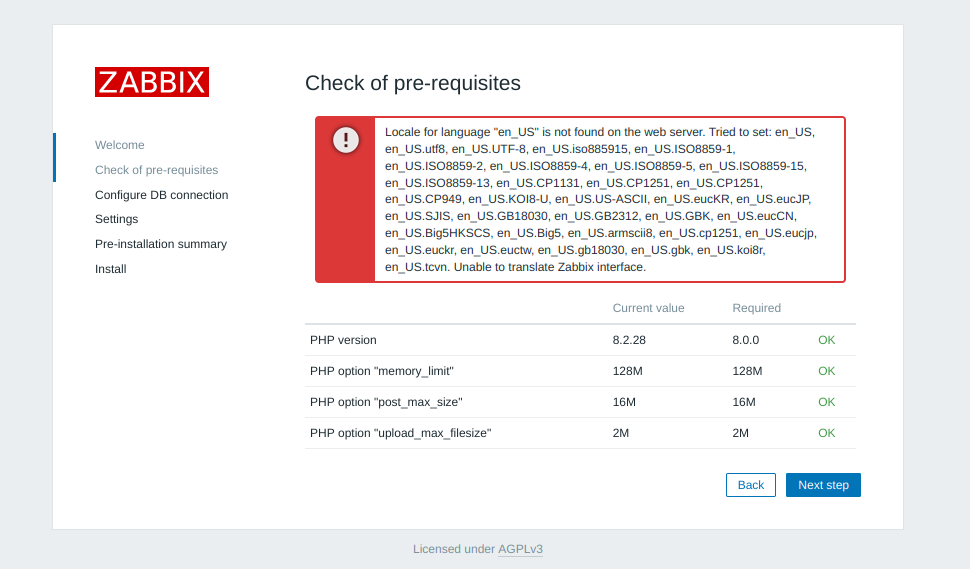
sudo dpkg-reconfigure locales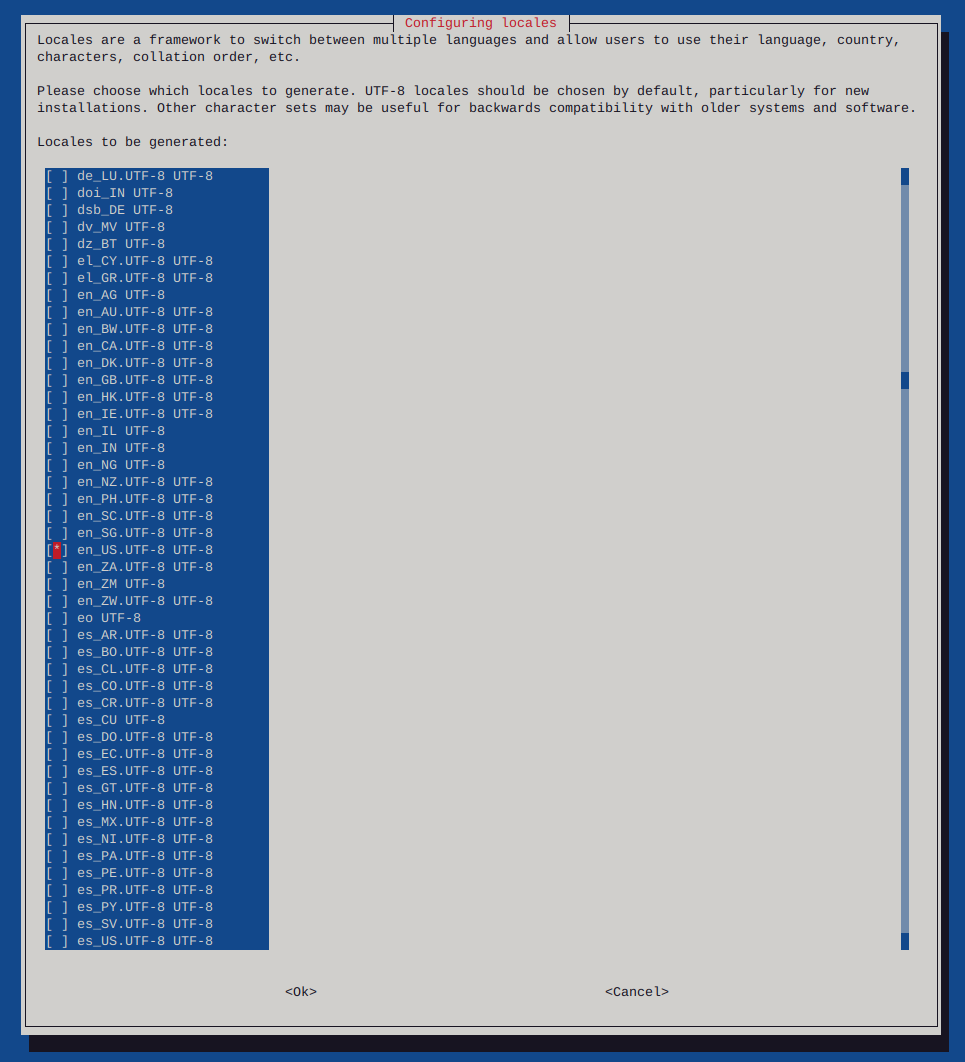

Reboot the system
sudo shutdown -r now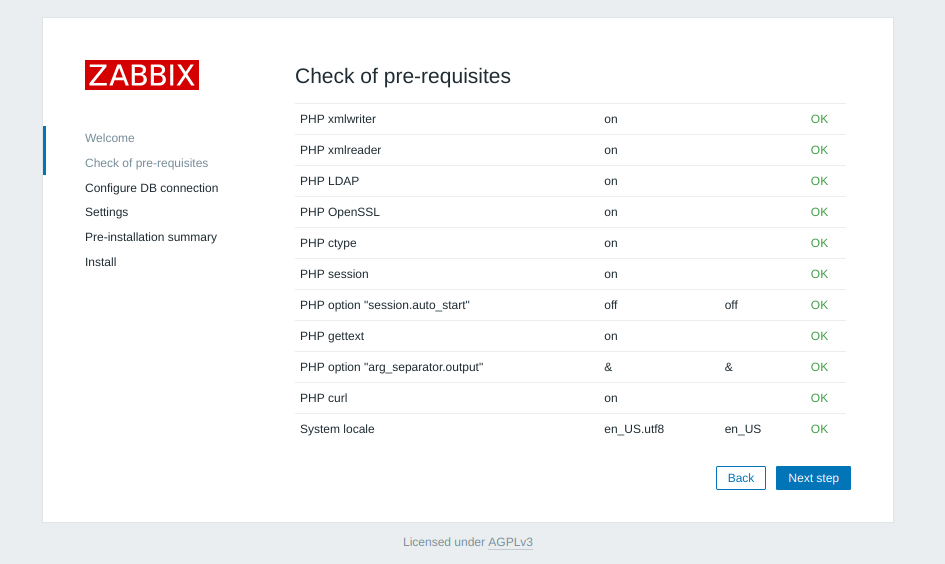
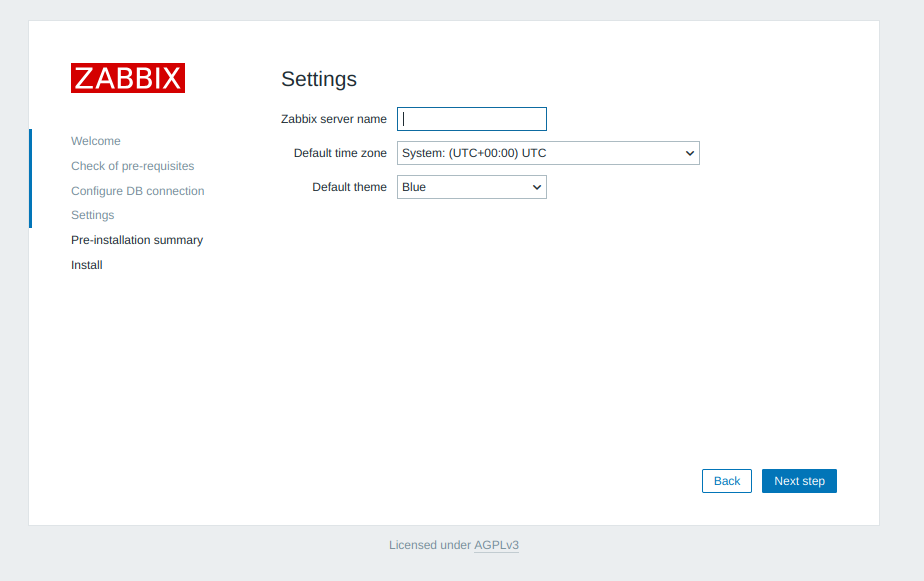
Add your database password
Add a server name
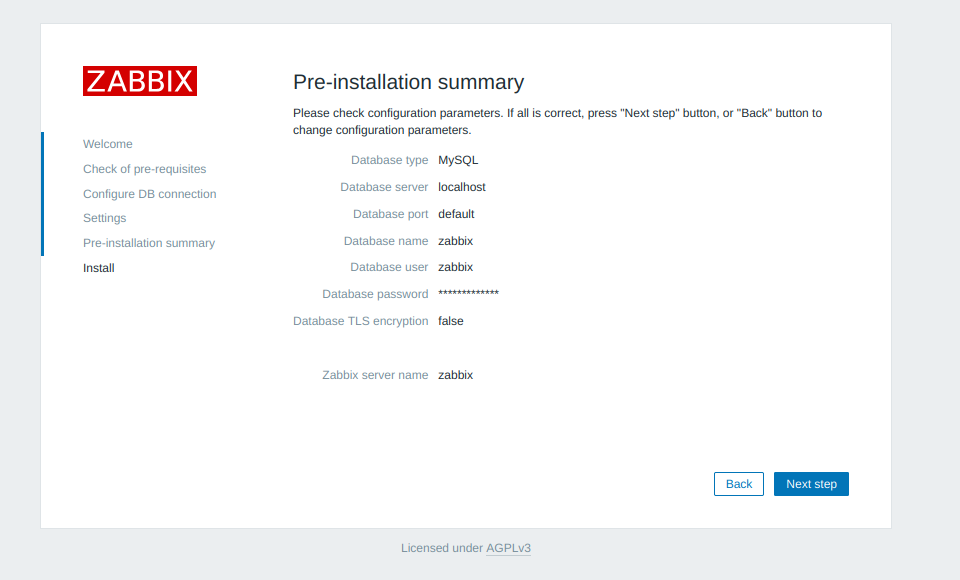
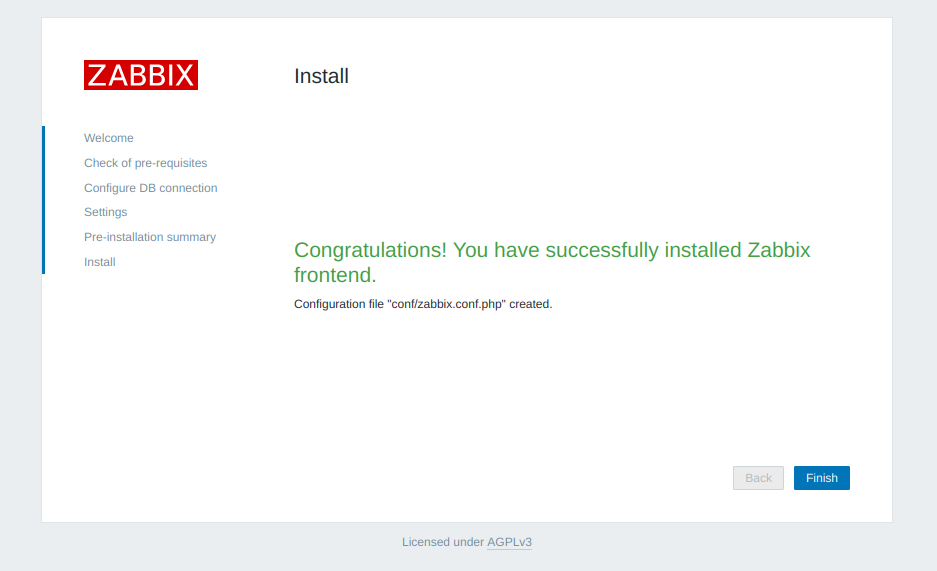
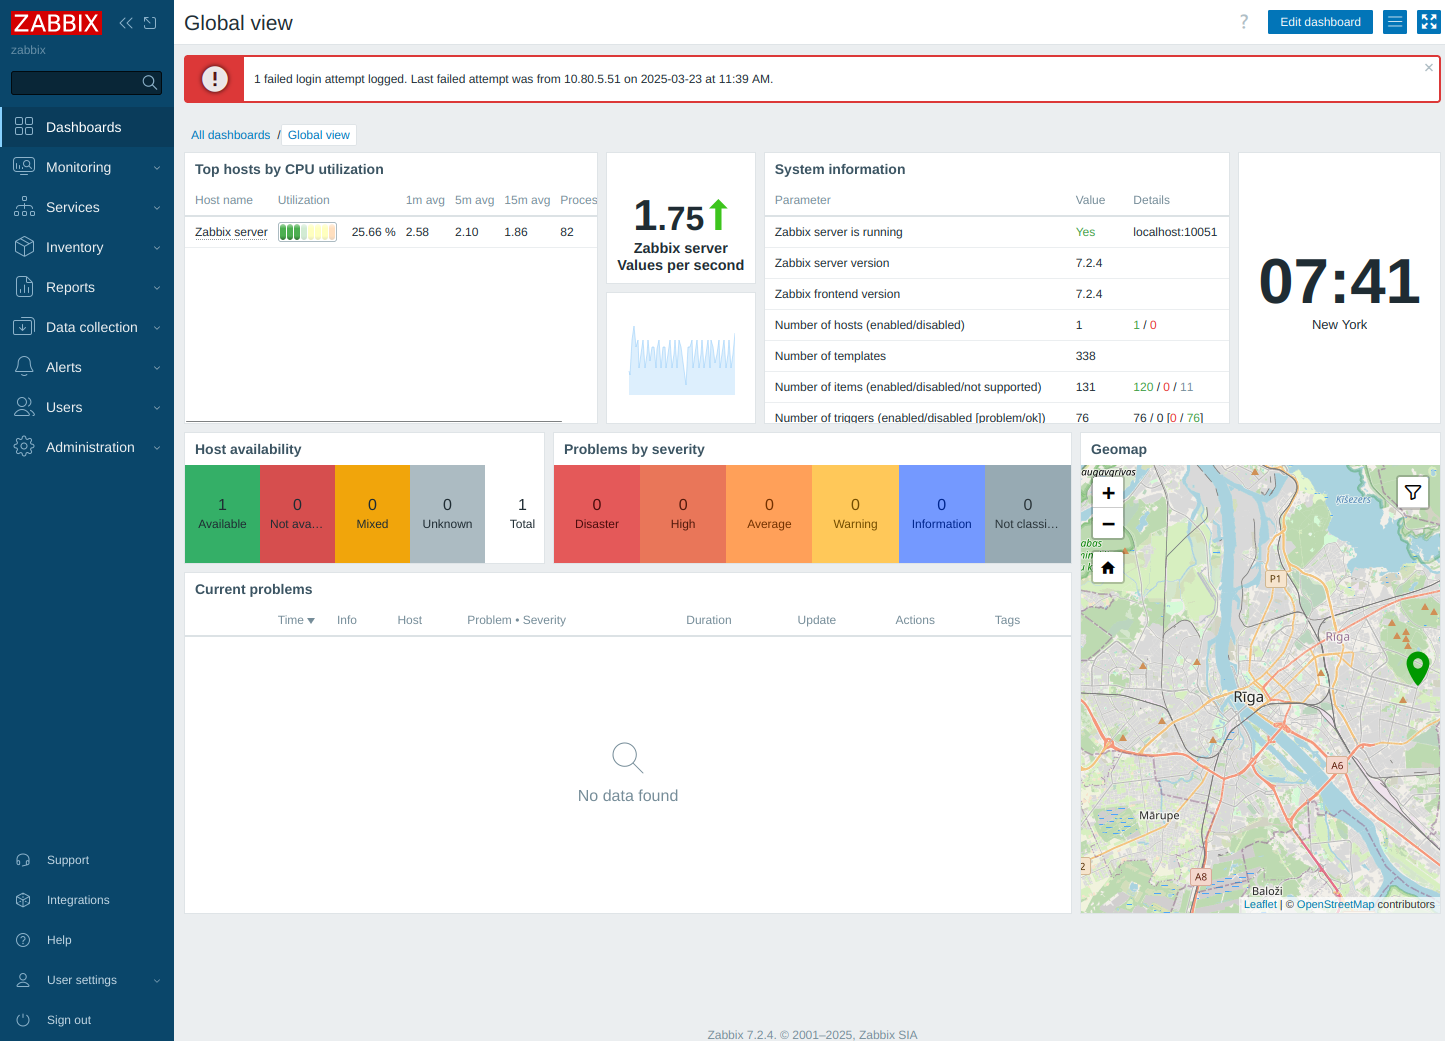
The default username is Admin, and the password is zabbix
-
no matching host key type foundUnable to negotiate with 10.10.1.35 port 22: no matching host key type found. Their offer: ssh-rsa,ssh-dss
While attempting ssh this error is generally due to mismatched versions of ssh, where an up to date version is attempting to access an older version
Add the following to your command :
The proper way:
ssh -o KexAlgorithms=diffie-hellman-group14-sha1 -oHostKeyAlgorithms=+ssh-dss 10.10.1.35The cheap way:
Example :
ssh -oHostKeyAlgorithms=+ssh-dss 10.10.1.35or ssh -oHostKeyAlgorithms=+ssh-dss user@10.10.1.35
This can be added to the ~/.ssh/config file
Host my-server HostName 10.10.1.35 HostKeyAlgorithms=+ssh-dss -
Print command name running on port osxPrint command name running on port
sudo lsof -iTCP -sTCP:LISTEN -n -P | awk 'NR>1 {print $9, $1, $2}' | sed 's/.*://' | while read port process pid; do echo "Port $port: $(ps -p $pid -o command= | sed 's/^-//') (PID: $pid)"; done | sort -n -
Locate HDDLocate hard drive and get information
ls -l /sys/block | grep sd.Output:
lrwxrwxrwx 1 root root 0 Jun 22 06:28 sda -> ../devices/pci0000:00/0000:00:1f.2/ata1/host0/target0:0:0/0:0:0:0/block/sda
lrwxrwxrwx 1 root root 0 Jun 22 06:28 sdb -> ../devices/pci0000:00/0000:00:1f.2/ata2/host1/target1:0:0/1:0:0:0/block/sdb
lrwxrwxrwx 1 root root 0 Jun 22 06:28 sdc -> ../devices/pci0000:00/0000:00:1f.2/ata3/host2/target2:0:0/2:0:0:0/block/sdc
lrwxrwxrwx 1 root root 0 Jun 22 06:28 sdd -> ../devices/pci0000:00/0000:00:1f.2/ata4/host3/target3:0:0/3:0:0:0/block/sdd
Or for a more detailed view
strace -e trace=open lsblkNAME MAJ:MIN RM SIZE RO TYPE MOUNTPOINTS sda 8:0 0 3.6T 0 disk ├─data--2-data--2_tmeta 252:3 0 15.9G 0 lvm │ └─data--2-data--2-tpool 252:9 0 3.6T 0 lvm │ ├─data--2-data--2 252:10 0 3.6T 1 lvm │ ├─data--2-vm--101--disk--0 252:11 0 8G 0 lvm │ ├─data--2-vm--103--disk--0 252:12 0 32G 0 lvm │ ├─data--2-vm--107--disk--0 252:13 0 500G 0 lvm │ └─data--2-vm--108--disk--0 252:20 0 100G 0 lvm └─data--2-data--2_tdata 252:6 0 3.6T 0 lvm └─data--2-data--2-tpool 252:9 0 3.6T 0 lvm ├─data--2-data--2 252:10 0 3.6T 1 lvm ├─data--2-vm--101--disk--0 252:11 0 8G 0 lvm ├─data--2-vm--103--disk--0 252:12 0 32G 0 lvm ├─data--2-vm--107--disk--0 252:13 0 500G 0 lvm └─data--2-vm--108--disk--0 252:20 0 100G 0 lvm sdb 8:16 0 698.6G 0 disk └─sdb1 8:17 0 698.6G 0 part /mnt/pve/backups sdc 8:32 0 3.6T 0 disk ├─vm--data-vm--data_tmeta 252:4 0 15.9G 0 lvm │ └─vm--data-vm--data-tpool 252:14 0 3.6T 0 lvm │ ├─vm--data-vm--data 252:15 0 3.6T 1 lvm │ ├─vm--data-vm--100--disk--0 252:16 0 270G 0 lvm │ ├─vm--data-vm--102--disk--0 252:17 0 100G 0 lvm │ ├─vm--data-vm--104--disk--0 252:18 0 25G 0 lvm │ └─vm--data-vm--106--disk--0 252:19 0 32G 0 lvm └─vm--data-vm--data_tdata 252:7 0 3.6T 0 lvm └─vm--data-vm--data-tpool 252:14 0 3.6T 0 lvm ├─vm--data-vm--data 252:15 0 3.6T 1 lvm ├─vm--data-vm--100--disk--0 252:16 0 270G 0 lvm ├─vm--data-vm--102--disk--0 252:17 0 100G 0 lvm ├─vm--data-vm--104--disk--0 252:18 0 25G 0 lvm └─vm--data-vm--106--disk--0 252:19 0 32G 0 lvm sdd 8:48 0 931.5G 0 disk ├─sdd1 8:49 0 1007K 0 part ├─sdd2 8:50 0 1G 0 part └─sdd3 8:51 0 930.5G 0 part ├─pve-swap 252:0 0 8G 0 lvm [SWAP] ├─pve-root 252:1 0 96G 0 lvm / ├─pve-data_tmeta 252:2 0 8.1G 0 lvm │ └─pve-data 252:8 0 794.3G 0 lvm └─pve-data_tdata 252:5 0 794.3G 0 lvm └─pve-data 252:8 0 794.3G 0 lvm +++ exited with 0 +++cat /proc/partitionsmajor minor #blocks name 8 0 3907018584 sda 8 16 732574584 sdb 8 17 732572672 sdb1 8 32 3907018584 sdc 8 48 976762584 sdd 8 49 1007 sdd1 8 50 1048576 sdd2 8 51 975712967 sdd3 252 0 8388608 dm-0 252 1 100663296 dm-1 252 2 8495104 dm-2 252 3 16650240 dm-3 252 4 16650240 dm-4 252 6 3873329152 dm-6 252 5 832888832 dm-5 252 7 3873329152 dm-7 252 8 832888832 dm-8 252 9 3873329152 dm-9 252 10 3873329152 dm-10 252 11 8388608 dm-11 252 12 33554432 dm-12 252 13 524288000 dm-13 252 14 3873329152 dm-14 252 15 3873329152 dm-15 252 16 283115520 dm-16 252 17 104857600 dm-17 252 18 26214400 dm-18 252 19 33554432 dm-19 252 20 104857600 dm-20Locate drive by serial and model information
hdparm -i /dev/sda/dev/sda: Model=WDC WD4000FYYZ-05UL1B0, FwRev=00.0NS05, SerialNo=WD-WCC132262513 Config={ HardSect NotMFM HdSw>15uSec SpinMotCtl Fixed DTR>5Mbs FmtGapReq } RawCHS=16383/16/63, TrkSize=0, SectSize=0, ECCbytes=0 BuffType=unknown, BuffSize=unknown, MaxMultSect=16, MultSect=off CurCHS=16383/16/63, CurSects=16514064, LBA=yes, LBAsects=7814037168 IORDY=on/off, tPIO={min:120,w/IORDY:120}, tDMA={min:120,rec:120} PIO modes: pio0 pio3 pio4 DMA modes: mdma0 mdma1 mdma2 UDMA modes: udma0 udma1 udma2 udma3 udma4 udma5 *udma6 AdvancedPM=yes: unknown setting WriteCache=disabled Drive conforms to: Unspecified: ATA/ATAPI-1,2,3,4,5,6,7 * signifies the current active mode -
Create gif from webm - command lineScreen recording can use webm as their format, it can be more simple to use a gif to embed into a website or forum, than adding scripts to host different video format.
In this case I grabbed a screen record of the progress for writing zeros to a hard drive with dd
Use ffmpeg to convert webm to gif:
First create a pallet:
Move into the directory which the webm is located, or type in the path
Where ‘dd.webm’ is the screen recording
ffmpeg -y -i dd.webm -vf palettegen palette.pngOutput:
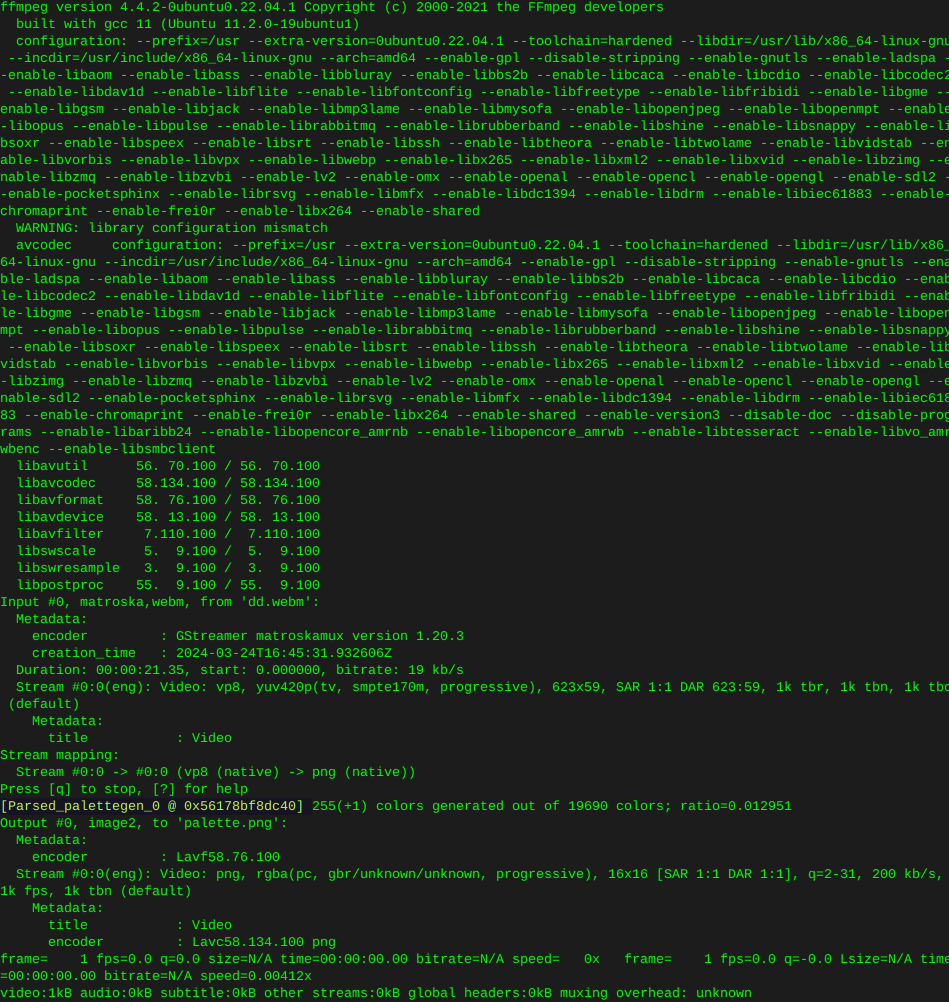
Then convert the webm to gif:
ffmpeg -y -i dd.webm -i palette.png -filter_complex paletteuse -r 10 dd.gif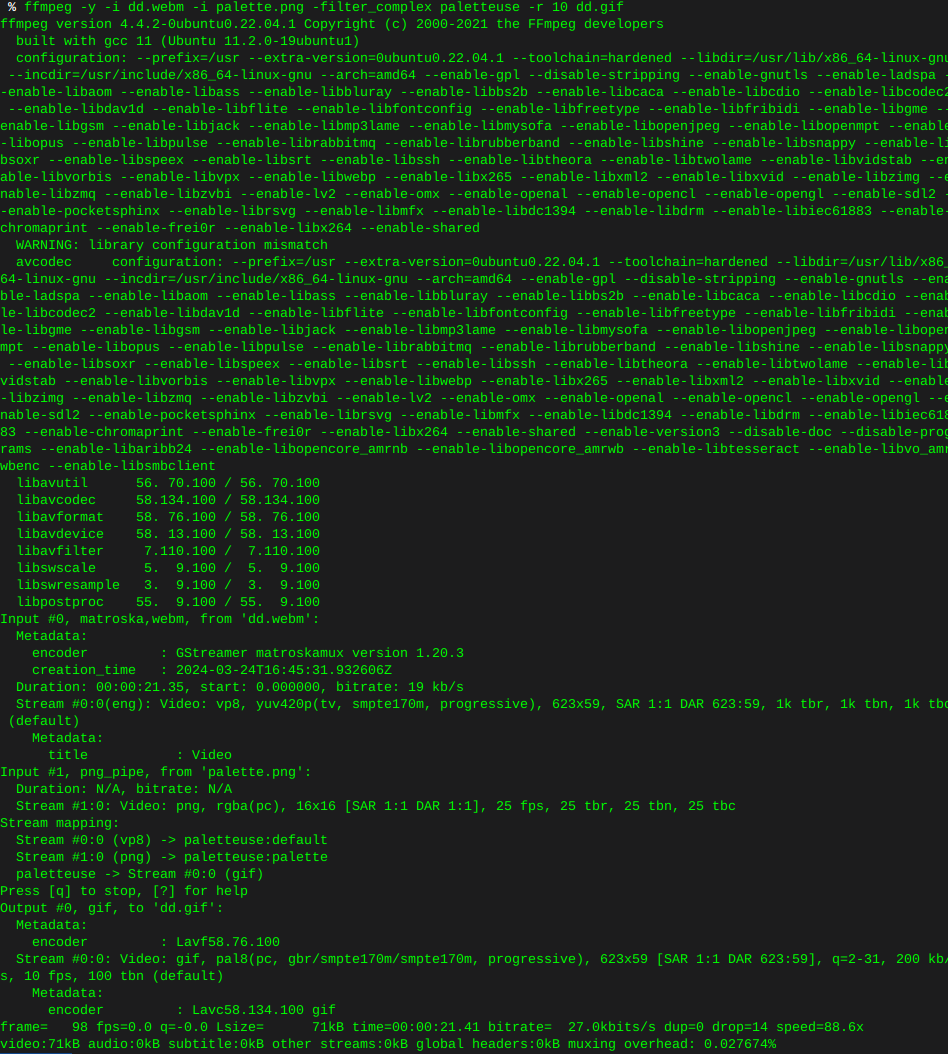
This is what I ended up with, looks like any image of any alien on the interwebz, as if shot through a potato, some tweaking of the command is in my future. None the less.

-
Erase hard drive - linux command lineWrite zeros to all sectors
Use the command ‘lsblk’ to find the drive you wish to erase
I’m using ‘dd’ to erase things
In this case I’m torching sdb
Only use status=progress if you care it’s not necessary
dd if=/dev/zero of=/dev/sdb bs=12M status=progress
-
zstd: error 70 no space leftRemove old kernel images that are cluttering the system
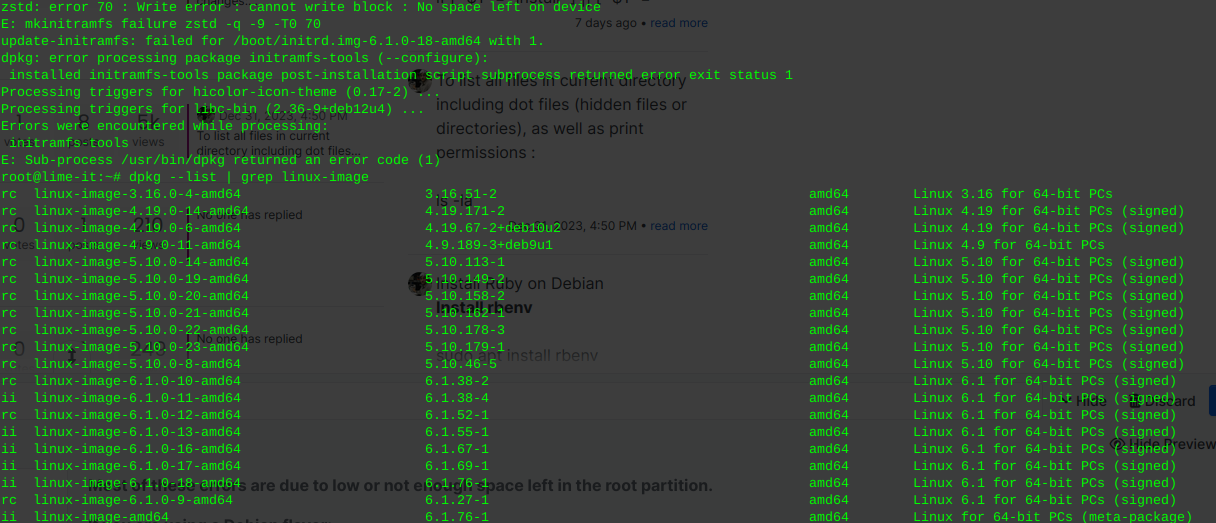
Most of these errors are due to low or not enough space left in the root partition.
If you are using a Debian flavor:
sudo apt-get autoremove --purge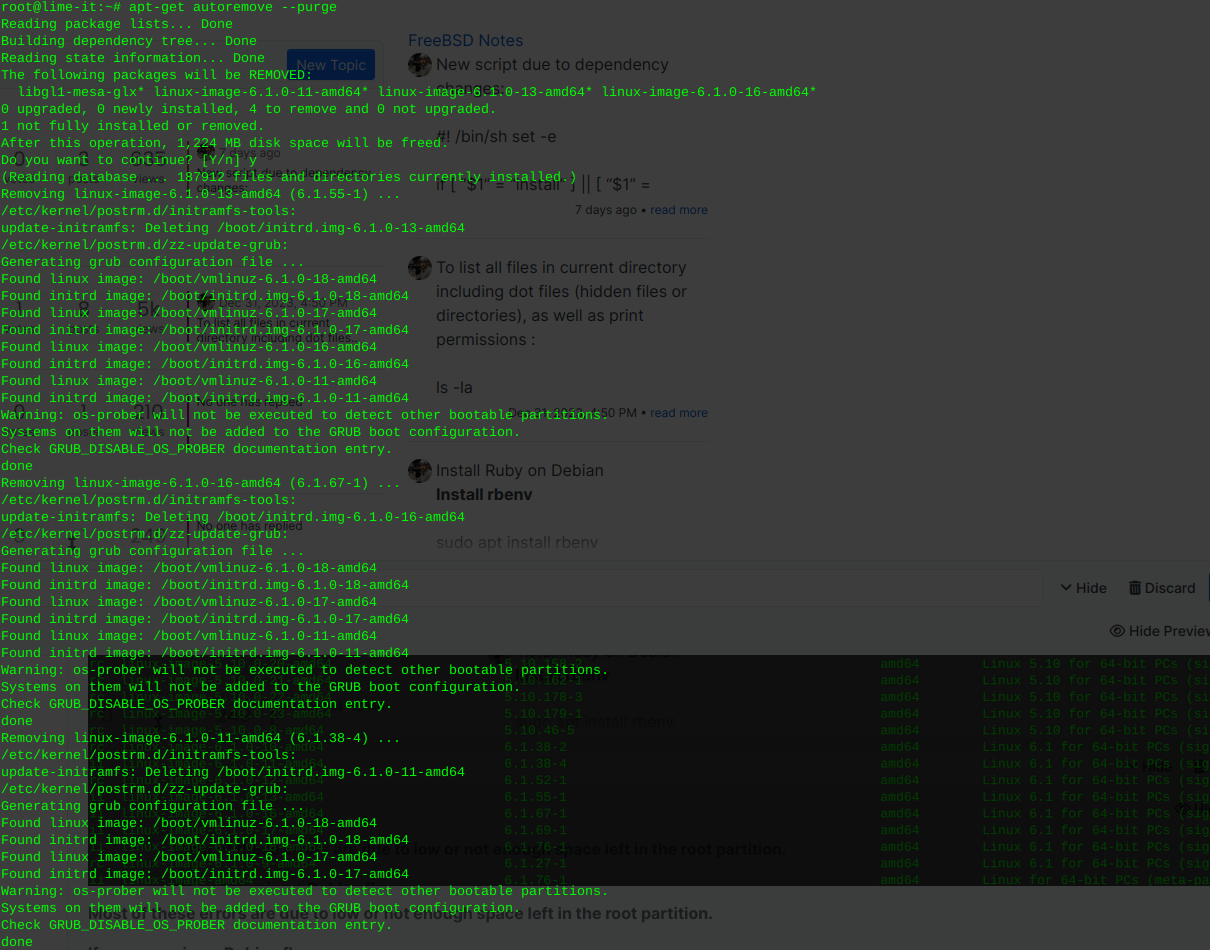
Inform grub whenever an old kernel is removed:
update-grub
Remove the un-used kernel config files:
These will be the files pre cursed as ‘rc’ where installed kernels use ‘ii’
… As well as files no longer used or required due to dependencies
This command will detect, print, and remove left over cruft from previously installed packages or scripts, that have been removed or updated.
sudo dpkg --purge $(dpkg -l | awk '/^rc/{print $2}')
You can re-run the following to view the installed kernel(s):
dpkg --list | grep linux-image
-
Install BackupPC4 Ubuntu Debian {script}New script due to dependency changes:
#! /bin/sh set -e if [ "$1" = "install" ] || [ "$1" = "upgrade" ]; then ACTION=$1 elif [ "$1" = "" ]; then ACTION=install else echo "usage: $(basename $0) action [source]" echo "action is either install (default) or upgrade" echo "source is either tar (default) or git" exit 1 fi if [ "$2" = "git" ] || [ "$2" = "tar" ]; then SOURCE=$2 elif [ "$2" = "" ]; then SOURCE=tar else echo "Unknown source $2!" exit 1 fi if [ "$BPC_UID" ] && [ $(getent passwd "$BPC_UID" | cut -d ':' -f 1) != "backuppc" ]; then echo "The uid = $BPC_UID is already in use!" exit 1 fi #Install dependencies apt-get -q update export DEBIAN_FRONTEND=noninteractive apt-get install -q -y apache2 apache2-utils libapache2-mod-perl2 par2 perl smbclient rsync tar gcc zlib1g zlib1g-dev rrdtool git make perl-doc libarchive-zip-perl libfile-listing-perl libxml-rss-perl libcgi-session-perl libacl1-dev wget iputils-ping pwgen #Set up backuppc user and directory if ! id backuppc >/dev/null 2>&1; then if [ "$BPC_UID" ]; then adduser --system --home /var/lib/backuppc --group --disabled-password --shell /bin/false --uid="$BPC_UID" backuppc else adduser --system --home /var/lib/backuppc --group --disabled-password --shell /bin/false backuppc fi fi mkdir -p /var/lib/backuppc/.ssh chmod 700 /var/lib/backuppc/.ssh echo -e "BatchMode yes\nStrictHostKeyChecking no" > /var/lib/backuppc/.ssh/config if [ ! -e /var/lib/backuppc/.ssh/id_rsa ]; then ssh-keygen -q -t rsa -b 4096 -N '' -C "BackupPC key" -f /var/lib/backuppc/.ssh/id_rsa fi chmod 600 /var/lib/backuppc/.ssh/id_rsa chmod 644 /var/lib/backuppc/.ssh/id_rsa.pub chown -R backuppc:backuppc /var/lib/backuppc/.ssh #Set password or read password file if [ "$BPC_PASS" ]; then PASSWORD="$BPC_PASS" elif [ -e /root/password ]; then PASSWORD=$(cat /root/password) chmod 600 /root/password else PASSWORD=$(pwgen -s -1 32) echo "$PASSWORD" > /root/password chmod 600 /root/password fi echo "backuppc:$PASSWORD" | chpasswd backuppc #Get BackupPC release versions get_latest_release() { wget -q -O - "https://api.github.com/repos/$1/releases/latest" | grep '"tag_name":' | sed -E 's/.*"([^"]+)".*/\1/' } bpcver=$(get_latest_release "backuppc/backuppc") bpcxsver=$(get_latest_release "backuppc/backuppc-xs") rsyncbpcver=$(get_latest_release "backuppc/rsync-bpc") mkdir -p /tmp/bpc cd /tmp/bpc if [ $SOURCE = "tar" ]; then ##Fetch and install latest stable releases wget https://github.com/backuppc/backuppc-xs/releases/download/$bpcxsver/BackupPC-XS-$bpcxsver.tar.gz wget https://github.com/backuppc/rsync-bpc/releases/download/$rsyncbpcver/rsync-bpc-$rsyncbpcver.tar.gz wget https://github.com/backuppc/backuppc/releases/download/$bpcver/BackupPC-$bpcver.tar.gz tar -zxf BackupPC-XS-$bpcxsver.tar.gz tar -zxf rsync-bpc-$rsyncbpcver.tar.gz tar -zxf BackupPC-$bpcver.tar.gz cd BackupPC-XS-$bpcxsver perl Makefile.PL make make test make install cd ../rsync-bpc-$rsyncbpcver ./configure make make install cd ../BackupPC-$bpcver fi if [ $SOURCE = "git" ]; then #Fetch and install the latest development code instead git clone https://github.com/backuppc/backuppc.git git clone https://github.com/backuppc/backuppc-xs.git git clone https://github.com/backuppc/rsync-bpc.git cd backuppc-xs perl Makefile.PL make make test make install cd ../rsync-bpc ./configure make make install cd ../backuppc ./makeDist --nosyntaxCheck --releasedate "`date -u "+%d %b %Y"`" --version ${bpcver}git tar -zxf dist/BackupPC-${bpcver}git.tar.gz cd BackupPC-${bpcver}git fi if [ $ACTION = "install" ]; then ./configure.pl --batch --cgi-dir /var/www/cgi-bin/BackupPC --data-dir /var/lib/backuppc --hostname backuppc --html-dir /var/www/html/BackupPC --html-dir-url /BackupPC --install-dir /usr/local/BackupPC fi if [ $ACTION = "upgrade" ]; then ./configure.pl --batch --config-path /etc/BackupPC/config.pl fi #Set up web server #Note that changing the apache user and group (/etc/apache2/envvars) could cause other services #provided by apache to fail. There are alternatives if you don't want to change the apache #user: use SCGI or a setuid BackupPC_Admin script - see the docs. cp httpd/BackupPC.conf /etc/apache2/conf-available/backuppc.conf sed -i "/Require local/d" /etc/apache2/conf-available/backuppc.conf sed -i "s/export APACHE_RUN_USER=www-data/export APACHE_RUN_USER=backuppc/" /etc/apache2/envvars sed -i "s/export APACHE_RUN_GROUP=www-data/export APACHE_RUN_GROUP=backuppc/" /etc/apache2/envvars echo '<html><head><meta http-equiv="refresh" content="0; url=/BackupPC_Admin"></head></html>' > /var/www/html/index.html a2enconf backuppc a2enmod cgid service apache2 restart #Set up backuppc service cp systemd/init.d/debian-backuppc /etc/init.d/backuppc chmod 755 /etc/init.d/backuppc update-rc.d backuppc defaults chmod u-s /var/www/cgi-bin/BackupPC/BackupPC_Admin touch /etc/BackupPC/BackupPC.users sed -i "s/$Conf{CgiAdminUserGroup}.*/$Conf{CgiAdminUserGroup} = 'backuppc';/" /etc/BackupPC/config.pl sed -i "s/$Conf{CgiAdminUsers}.*/$Conf{CgiAdminUsers} = 'backuppc';/" /etc/BackupPC/config.pl chown -R backuppc:backuppc /etc/BackupPC echo $PASSWORD | htpasswd -i /etc/BackupPC/BackupPC.users backuppc service backuppc start #Clean up cd rm -rf /tmp/bpc echo "All done!" exit 0 -
Basic Linux Terminal CommandsTo list all files in current directory including dot files (hidden files or directories), as well as print permissions :
ls -la -
Install Ruby on DebianInstall Ruby on Debian
Install rbenv
sudo apt install rbenvThen initialize the environment:
rbenv init
nano ~/.bashrcType or paste the output above, Ctrl +x to save
Apply:
source .bashrcInstall ruby-build
Install git:
sudo apt install git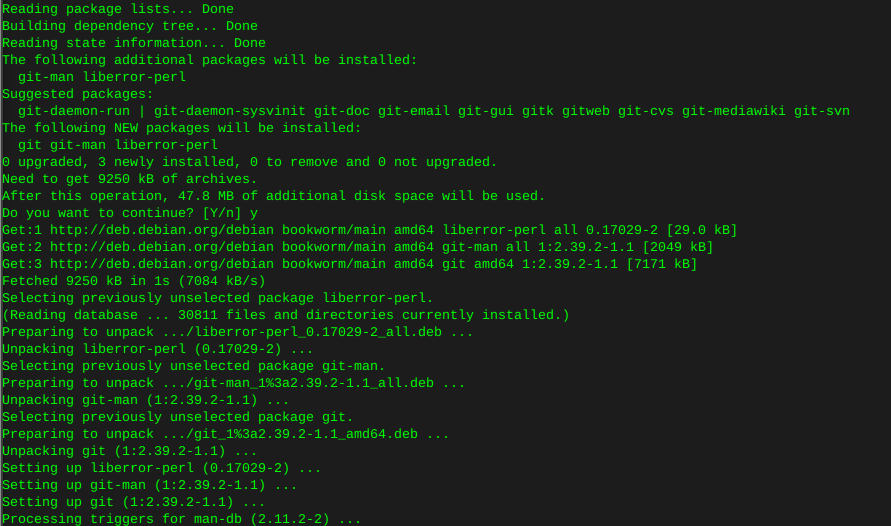
mkdir -p "$(rbenv root)"/pluginsClone to local:
git clone https://github.com/rbenv/ruby-build.git "$(rbenv root)"/plugins/ruby-build
curl -fsSL https://github.com/rbenv/rbenv-installer/raw/main/bin/rbenv-doctor | bash
Now install Ruby:
print ruby versions available
rbenv install --list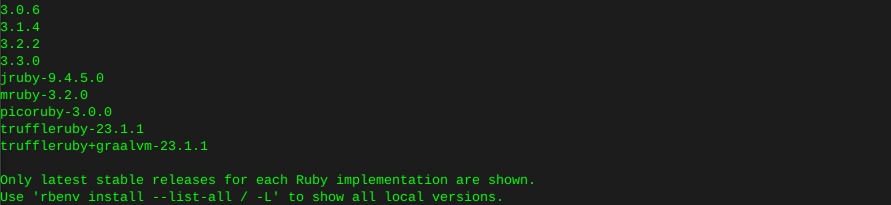
Install the latest version unless you have a reason otherwise:
rbenv install 3.3.0On this system there was an error compiling at this point with fiddle, as well as psych:
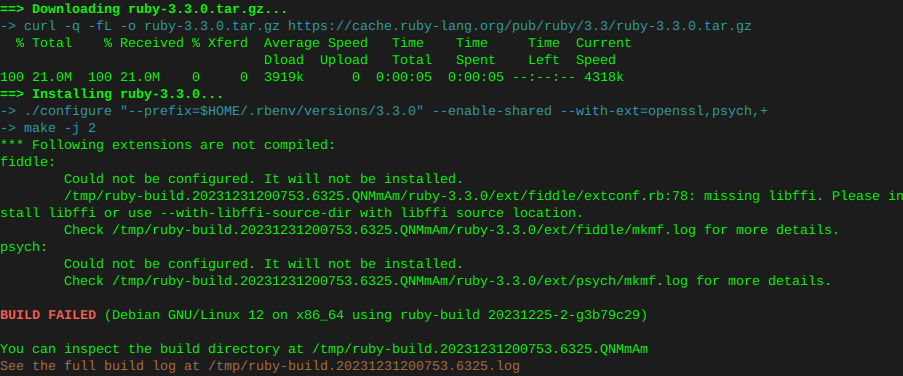
Therefore manually installing the following filled dependencies
sudo apt install libtool
sudo apt install libffi-dev
rbenv global 3.3.0print installed ruby version
ruby -v
-
Basic file permissions755 - Owner has all permissions, and Group and Other can read and execute 700 - Owner has all permissions 644 - Owner can read and write, and Group and Other can read 600 - Owner can read and write 775 - Owner can read and write, and Group and Other can read 770 - Owner and Group have all, and Other can read and execute 750 - Owner has all permissions, and Group can read and execute 664 - Owner and Group can read and write, and Other can just read 660 - Owner and Group can read and write 640 - Owner can read and write, and Group can read -
Install locate *nixRe: Find or Locate a file or extension command line
Install locate command linux: Use your sudo command!
apt install mlocateOR:
apt-get install mlocateOR:
yum install mlocateUpdate the database:
updatedbDepending on the size of the complete filesystem this could take a few minutes
After the database has been populated:
locate mariadbWhere mariadb is the word your looking for
-
Set script to executableThese commands are if you are in the scripts directory! Changing permissions can be done from anywhere in the structure.
Such as :
chmod +x /opt/so-elastic-agent_linux_amd64Terminal chmod to executable :
Permissions prior to chmod :

chmod +x so-elastic-agent_linux_amd64Permissions following chmod :

Then execute :
./so-elastic-agent_linux_amd64Insure you are acting as the user you just gave permissions to (the file owner) or at least have sudo privileges
To make the script un-executable:
chmod -x so-elastic-agent_linux_amd64 -
Install OwnCloud4 on Debian12sudo apt install lsb-release ca-certificates curl -yGPG key and repo for php 7.4
sudo curl -sSLo /usr/share/keyrings/deb.sury.org-php.gpg https://packages.sury.org/php/apt.gpgsudo sh -c 'echo "deb [signed-by=/usr/share/keyrings/deb.sury.org-php.gpg] https://packages.sury.org/php/ $(lsb_release -sc) main" > /etc/apt/sources.list.d/php.list'Update the system with the new repository in place
sudo apt updateInstall the dependencies for OwnCloud (LAMP ect) Certbot, or LetsEncrypt is being installed as well, if you are using this installation in a public domain
sudo apt install apache2 mariadb-server imagemagick certbot python3-certbot-apache smbclient redis-server unzip rsync libapache2-mod-php7.4 php7.4 php7.4-intl php7.4-mysql php7.4-mbstring php7.4-imagick php7.4-igbinary php7.4-gmp php7.4-bcmath php7.4-curl php7.4-gd php7.4-zip php7.4-imap php7.4-ldap php7.4-bz2 php7.4-ssh2 php7.4-common php7.4-json php7.4-xml php7.4-dev php7.4-apcu php7.4-redis libsmbclient-dev php-pear php-phpseclibEnable apache2 and then verify it’s status
sudo systemctl is-enabled apache2sudo systemctl status apache2 Enable MariaDB and verify status
sudo systemctl is-enabled mariadbsudo systemctl status mariadb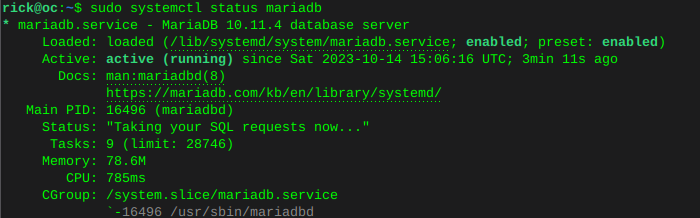 Enable Redis and verify status
sudo systemctl is-enabled redissudo systemctl status redis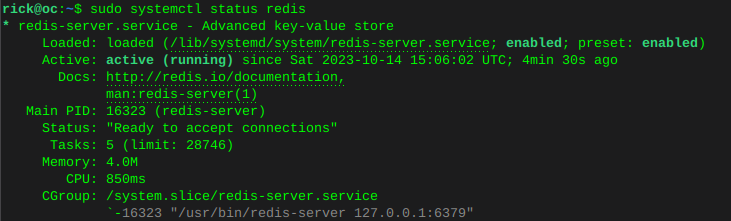
Configure default php version
sudo update-alternatives --config php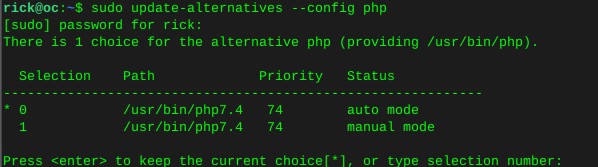

Configure php OwnCloud dependencies
sudo update-alternatives --set phar /usr/bin/phar7.4sudo update-alternatives --set phar.phar /usr/bin/phar.phar7.4sudo update-alternatives --set phpize /usr/bin/phpize7.4sudo update-alternatives --set php-config /usr/bin/php-config7.4Upgrade Pear to OwnCloud4 requirements
sudo mkdir -p /tmp/pear/cachesudo pear upgrade --force --alldeps http://pear.php.net/get/PEAR-1.10.13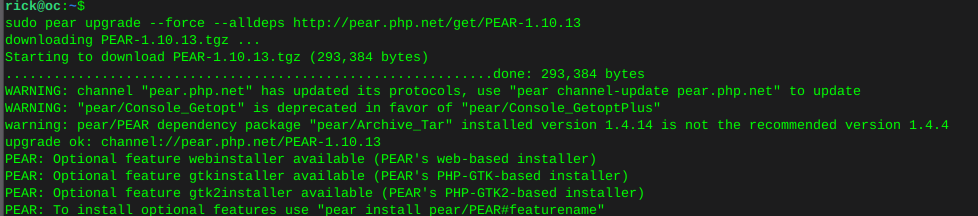
sudo pear clear-cachesudo pear update-channelssudo pear upgrade --forcesudo pear upgrade-allVerify Pear version
pear version
Configure MariaDB
sudo mariadb-secure-installation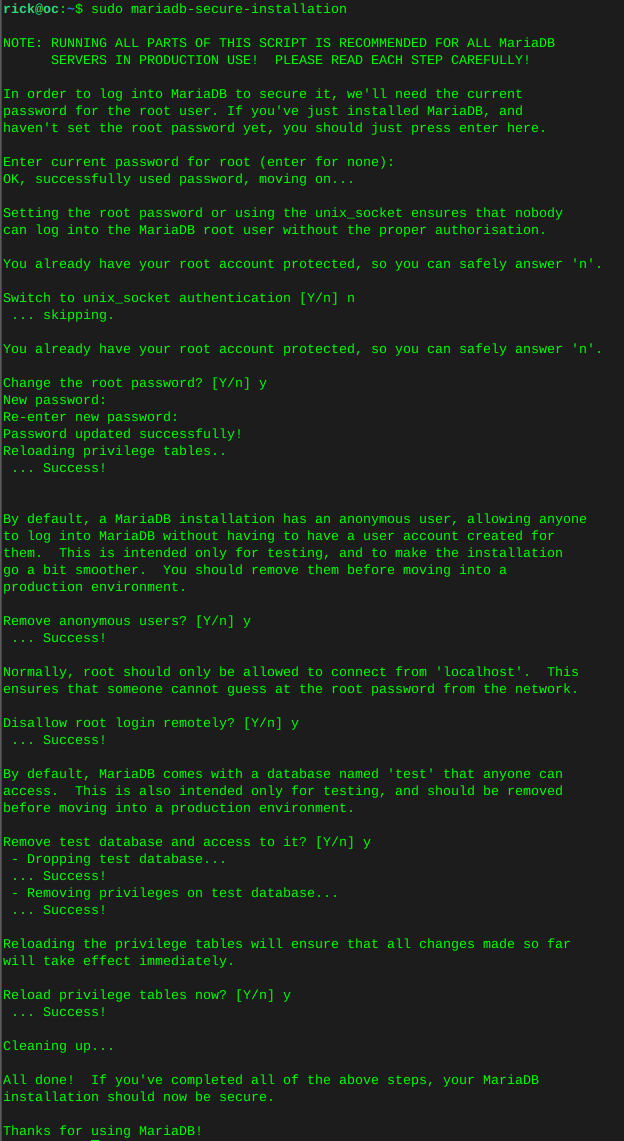
Log into MariaDB
sudo mariadb -u root -pCreate the OwnCloud database:
This is where many go wrong, we do not use ‘password’ we replace password, with our own password.
CREATE DATABASE owncloud;We just created a database with the name owncloud
CREATE USER IF NOT EXISTS 'owncloud'@'localhost' IDENTIFIED BY 'password';We just created a database user called owncloud
GRANT ALL PRIVILEGES ON owncloud.* TO 'owncloud'@'localhost' WITH GRANT OPTION;We just allowed user owncloud, full privileges on database owncloud
FLUSH PRIVILEGES;Now verify what we have just done:
SHOW GRANTS FOR 'owncloud'@'localhost';You can see below I named this database ‘oc’ and the ‘oc’ user has privileges on database ‘owncloud’

quit;
wget the OwnCloud source
cd /var/wwwwget https://download.owncloud.com/server/stable/owncloud-complete-latest.tar.bz2Grab sha256 to verify the download
wget https://download.owncloud.com/server/stable/owncloud-complete-latest.tar.bz2.sha256BEFORE installing, verify if the download of OwnCloud matches what the OwnCloud team wanted you to have, this is important always.
sudo sha256sum -c owncloud-complete-latest.tar.bz2.sha256 < owncloud-complete-latest.tar.bz2Out put should say ‘OK’ if everything matches.
Change ownership of the directory to www-data user.
sudo chown -R www-data:www-data /var/www/owncloud
Configure Vhost for OwnCloud
This will open a new file in 'sites-available and name this file ‘owncloud.conf’
Change the ServerName and ServerAlias, as well as log file names, to whatever your domain is. There are many ways to do this keep in mind.
sudo nano /etc/apache2/sites-available/owncloud.conf<VirtualHost *:80> ServerName oc ServerAlias www.oc DocumentRoot /var/www/owncloud ErrorLog ${APACHE_LOG_DIR}/oc.io-error.log CustomLog ${APACHE_LOG_DIR}/oc.io-access.log combined Alias /owncloud "/var/www/owncloud/" <Directory /var/www/owncloud/> Options +FollowSymlinks AllowOverride All <IfModule mod_dav.c> Dav off </IfModule> SetEnv HOME /var/www/owncloud SetEnv HTTP_HOME /var/www/owncloud </Directory> </VirtualHost>Enable and verify the owncloud vhost
sudo a2ensite owncloud.confsudo apachectl configtest
Now install OwnCloud
Change the database name, user, and password to whatever you named the OwnCloud database earlier;
Change the ‘admin user’ and ‘admin pass’ to whatever you want the new OwnCloud admin account to be.
sudo -u www-data /var/www/owncloud/occ maintenance:install \
   --database "mysql" \
   --database-name "owncloud" \
   --database-user "owncloud"\
   --database-pass "password" \
   --admin-user "admin" \
   --admin-pass "your new owncloud admin password"
Edit the OwnCloud config file to add the domain you used earlier in the Apache2 vhost file:
sudo nano /var/www/owncloud/config/config.php'trusted_domains' => array ( 0 => 'localhost', 1 => 'whatever your domain is goes here', ),
Personally I restart the server at this point, which will restart all services. Then visit the domain / IP of your settings and you should see the OwnCloud login page. Use the credentials you setup for the admin user.
System cron setting:
sudo crontab -u www-data -e*/15 * * * * /usr/bin/php -f /var/www/owncloud/occ system:cronMemcache with Redis we installed earlier:
sudo nano /var/www/owncloud/config/config.php'filelocking.enabled' => true, 'memcache.local' => '\OC\Memcache\APCu', 'memcache.locking' => '\OC\Memcache\Redis', 'redis' => [ 'host' => 'localhost', 'port' => 6379, ],Go restart the server again and enjoy!
-
Only one CPU is allowed in this systemComment out in=>
/usr/lib/python3/dist-packages/middlewared/plugins/vm/vms.py# elif flags['intel_vmx']: # if vcpus > 1 and flags['unrestricted_guest'] is False: # verrors.add(f'{schema_name}.vcpus', 'Only one Virtual CPU is allowed in this system.') # elif flags['amd_rvi']: # if vcpus > 1 and flags['amd_asids'] is False: # verrors.add( # f'{schema_name}.vcpus', 'Only one virtual CPU is allowed in this system.' # )At this point we must comment out each time we update the system.
-
Find system manufacturer